This has become my ultimate favourite smokey eye type lately! I love it :) My brows are messy - deal with it.
Brushes Used In This Tutorial: (I left one out, I'm sorry but I only have time to post this entry now and it's very late at night and I have been working on this tutorial for hours. The one I left out can be found in my Beauty Tools For Beginners and it's the MAC 213)

1: MAC 239 Eye shadow brush (Used to apply gold and copper shadow)
2: Ruby and Millie Slanted Eye Liner Brush (Used to line the copper and brown shadow on lower lashes)
3: Barry M Blusher/Bronzer/Powder 3 in 1 Brush (Used to apply both my translucent powder and blusher. I don't have any problems with my blusher or translucent powder 'mixing' when I use it for both by the way)
Products Used In This Tutorial: (I know, the light hit the blusher, I'm sorry, again for the same reason above I didn't have time to retake the photo. The blusher is a shimmery deepish pink colour)
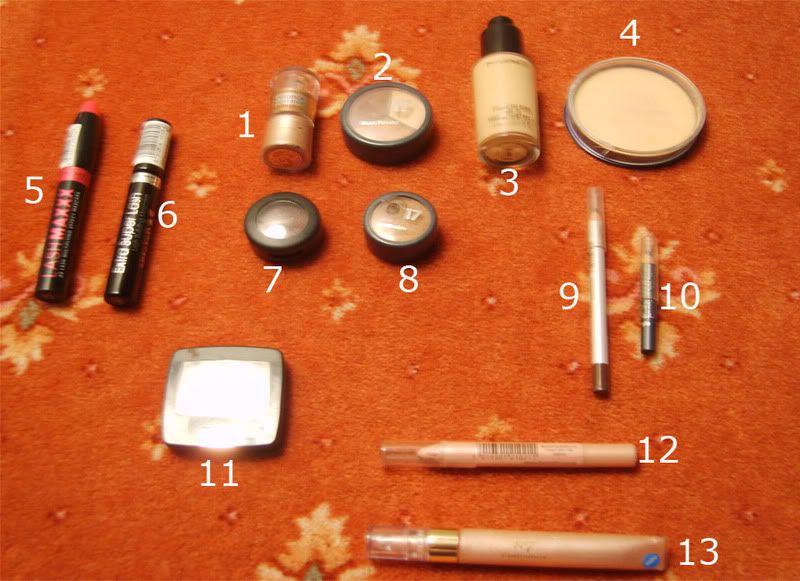
1: Bourjois Shimmering Shine Liquid Eye Shadow number 33 in 'Beige Metallique'
2: No17 Eye Shadow Trio in 'Metallic Toffee'
3: MAC NW15 liquid foundation
4: Collection 2000 Translucent Powder
5: Rimmel Lash XXX Mascara in 'black/non-waterproof'
6: Rimmel Extra Super Lash Mascara in 'black/non-waterproof'
7: MAC Eye Shadow in 'Velvet'
8: No17 Glitter Eye Shadow in 'Chalice'
9: Natural Collection Eye Liner pencil in 'Brown'
10: No17 Eye Liner Pencil in 'Onyx'
11: No7 Blusher #35 in 'Pink Shimmer'
12: Barry M Shimmer Eye/Lip Pencil #5
13: No7 Liplicious Lip Gloss in 'Angel Cake'
Step One:
First apply the Barry M #1 Eye/Lip pencil as a base (or any base you are comfortable using): Then take Bourjois Shimmering Shine Liquid Eye Shadow in 33 Beige Metallique and apply one coat to the entire lid. The applicator allows you to both dab and sweep the shadow on but because it is liquid shadow it might stick better to your skin (depending on your skin type) if you dab it. Personally I swept mine on and it worked perfectly for me. Try whatever works for you. Let it dry and then apply another coat over the top to strengthen the colour.
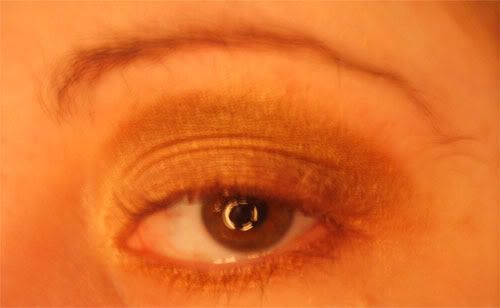
Then I dabbed some of the lightish gold colour from the No17 trio into the corner of my eye, stopping one third of the way over the lid. What you can see in the photo is not a 'gap' but where I applied the colour and my camera picked it up a bit oddly!
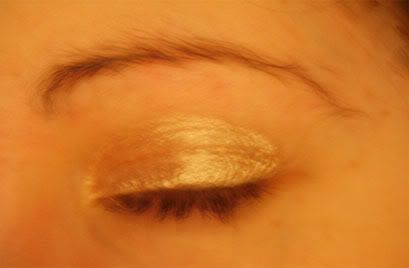
Step Two:
Take a little of the darker brown colour from the No17 trio and dab some over the outer corner of your lid. Stop about one third of the way in. Then blend the same colour into your crease, taking the shadow all the way in to the corner of your eye and slightly higher on your brow bone but don't go further than the brow bone. If you feel the area around your lid/eye socket you'll feel a hard area that is your brow bone. Going further up than that with any shadow will make you look overdone and decrease the size of your eyes so be careful about that. This will give you that 'smokey' effect. If you find you have a sharp line where your darker shadow meets your lighter shadow just diffuse the line with your brush using circular or back and forth motions. I personally do not like using circular motions to blend this part because it sends the shadow here there and everywhere on my lids (I have larger lids so it makes too much of a mess for my taste!) but you should do what you're comfortable with.
Step Three:
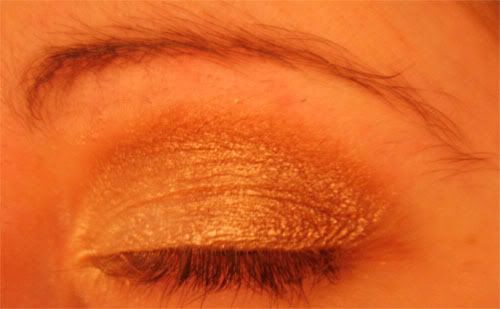
Take the copper shadow and dab it over the middle and outer corner of the lid over the brown and then blend into the brown using circular motions or whatever motion you are happy with. You can use the coppery colour from the trio but I prefer to use my separate copper shadow. This will give the darker brown from the trio a nice coppery/shimmery effect. Add a little of the brown (from the same trio) over the top of the copper again to darken it slightly so that it remains quite 'smokey' looking. (The copper may lighten the brown) I also added a very small amount of MAC 'Velvet' and blended it (with my MAC fluff brush. See: 'Beauty Tools For Beginners' entry for the exact number of the brush) into the brown to offer a really nice smokey appearance to the shadow. Any black shadow will do the job in the same way. Just be sure not to use too much because it will over power the brown and copper and look too harsh. Tip: Remember less is more and it's harder to go back and remove a lot of shadow so apply your shadow little by little :)
Step Four:
After all of that blending you may find the No17 goldish colour has been overrun by the brown and copper shadows so feel free to 'top up' that area if the colour has faded.
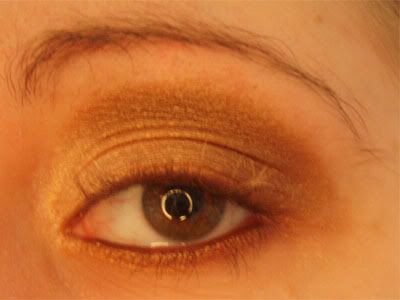
Line the lower lash line using the copper shadow on a slanted eyeliner brush. Starting from the inner corner, blend the shadow out using the tip of your slanted brush. Stop about one third of the way out.
*Tip: Dab along the lower lash line first before blending as this will insure the colour shows up. Go in between the lashes to blend the shadow to insure a well defined line with no gaps.* Clean up the edge of your line using a damp cotton bud. (I dampen mine with water)
If you do not have a slanted liner brush:
You can use a cotton bud to blend out the shadow after applying it with a normal eye shadow brush if you don't have a slanted liner brush. A liner brush is more ideal because it is smaller and creates a thinner, more even line but if you don't have one then use your regular eye shadow brush to line the lash line and blend with a cotton bud. The regular sponge tip applicators that come with eye shadows are ideal for this purpose too. If you use this method you can tidy up the line using a clean damp cotton bud.
Then line the rest of your lower lash line (starting from where you ended with the copper shadow) and in between your lower lashes with the brown shadow using the same slanted liner brush or using the alternative method mentioned in the previous step.
Step Five:
Line your upper and lower waterlines with the brown eyeliner pencil.
If you find black liner too harsh for your eyes or you do not like to use black as an eyeliner then skip to the next step now.
Otherwise go over the brown with a black eyeliner pencil on both waterlines. I like this because it gives a nice brown/black colour. You could use a black/brown pencil to save using two pencils but I had the both colours so I didn't mind using two.
Step Six:
Apply two coats of mascara. Allow the first coat to dry before applying the second. First I used Rimmel LashXXX to separate my lashes and then I used Rimmel Extra Super Lash to add volume and thickness.
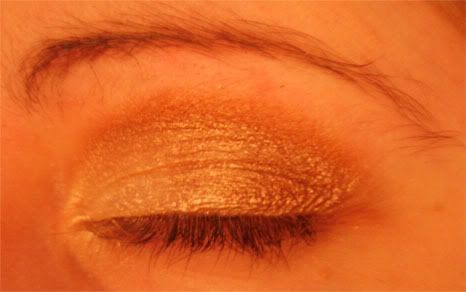
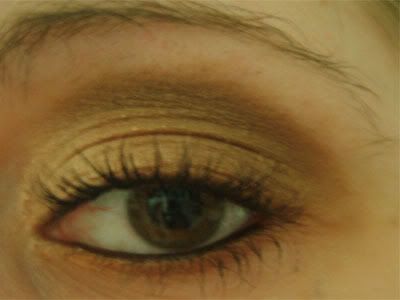
This is the complete eye in natural light:
Step Seven:
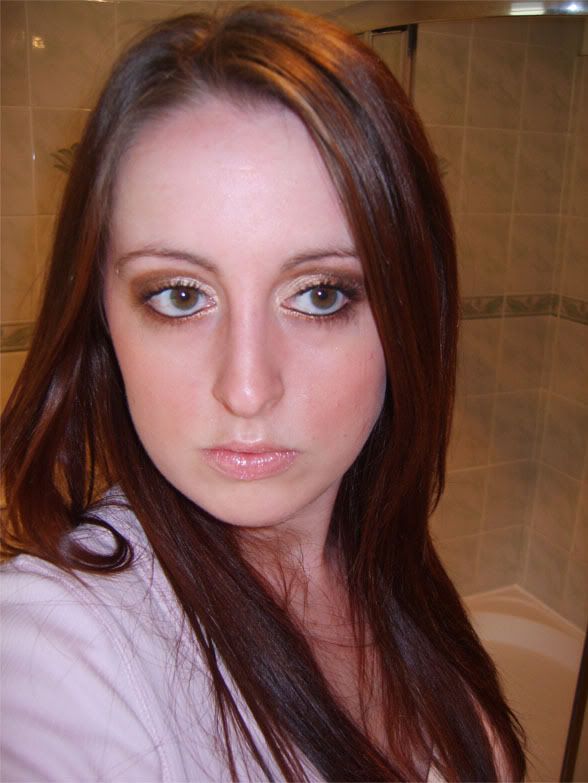
Apply foundation and then buff (circular motions with a powder brush) some translucent powder over the top all over the face. Add blusher to the apples of your cheeks and blend (again, with circular motions with your blusher brush.)
Apply lipgloss to finish. I used Barry M #5 Eye/Lip pencil over the top of the No7 lipgloss listed in the product list to make the gloss 'frostier' and more pink in appearance.
This is the finished look :) (Yes, I am in my bathroom because the lighting rules in there :D)
Brushes Used In This Tutorial: (I left one out, I'm sorry but I only have time to post this entry now and it's very late at night and I have been working on this tutorial for hours. The one I left out can be found in my Beauty Tools For Beginners and it's the MAC 213)
1: MAC 239 Eye shadow brush (Used to apply gold and copper shadow)
2: Ruby and Millie Slanted Eye Liner Brush (Used to line the copper and brown shadow on lower lashes)
3: Barry M Blusher/Bronzer/Powder 3 in 1 Brush (Used to apply both my translucent powder and blusher. I don't have any problems with my blusher or translucent powder 'mixing' when I use it for both by the way)
Products Used In This Tutorial: (I know, the light hit the blusher, I'm sorry, again for the same reason above I didn't have time to retake the photo. The blusher is a shimmery deepish pink colour)
1: Bourjois Shimmering Shine Liquid Eye Shadow number 33 in 'Beige Metallique'
2: No17 Eye Shadow Trio in 'Metallic Toffee'
3: MAC NW15 liquid foundation
4: Collection 2000 Translucent Powder
5: Rimmel Lash XXX Mascara in 'black/non-waterproof'
6: Rimmel Extra Super Lash Mascara in 'black/non-waterproof'
7: MAC Eye Shadow in 'Velvet'
8: No17 Glitter Eye Shadow in 'Chalice'
9: Natural Collection Eye Liner pencil in 'Brown'
10: No17 Eye Liner Pencil in 'Onyx'
11: No7 Blusher #35 in 'Pink Shimmer'
12: Barry M Shimmer Eye/Lip Pencil #5
13: No7 Liplicious Lip Gloss in 'Angel Cake'
Step One:
First apply the Barry M #1 Eye/Lip pencil as a base (or any base you are comfortable using): Then take Bourjois Shimmering Shine Liquid Eye Shadow in 33 Beige Metallique and apply one coat to the entire lid. The applicator allows you to both dab and sweep the shadow on but because it is liquid shadow it might stick better to your skin (depending on your skin type) if you dab it. Personally I swept mine on and it worked perfectly for me. Try whatever works for you. Let it dry and then apply another coat over the top to strengthen the colour.
Then I dabbed some of the lightish gold colour from the No17 trio into the corner of my eye, stopping one third of the way over the lid. What you can see in the photo is not a 'gap' but where I applied the colour and my camera picked it up a bit oddly!
Step Two:
Take a little of the darker brown colour from the No17 trio and dab some over the outer corner of your lid. Stop about one third of the way in. Then blend the same colour into your crease, taking the shadow all the way in to the corner of your eye and slightly higher on your brow bone but don't go further than the brow bone. If you feel the area around your lid/eye socket you'll feel a hard area that is your brow bone. Going further up than that with any shadow will make you look overdone and decrease the size of your eyes so be careful about that. This will give you that 'smokey' effect. If you find you have a sharp line where your darker shadow meets your lighter shadow just diffuse the line with your brush using circular or back and forth motions. I personally do not like using circular motions to blend this part because it sends the shadow here there and everywhere on my lids (I have larger lids so it makes too much of a mess for my taste!) but you should do what you're comfortable with.
Step Three:
Take the copper shadow and dab it over the middle and outer corner of the lid over the brown and then blend into the brown using circular motions or whatever motion you are happy with. You can use the coppery colour from the trio but I prefer to use my separate copper shadow. This will give the darker brown from the trio a nice coppery/shimmery effect. Add a little of the brown (from the same trio) over the top of the copper again to darken it slightly so that it remains quite 'smokey' looking. (The copper may lighten the brown) I also added a very small amount of MAC 'Velvet' and blended it (with my MAC fluff brush. See: 'Beauty Tools For Beginners' entry for the exact number of the brush) into the brown to offer a really nice smokey appearance to the shadow. Any black shadow will do the job in the same way. Just be sure not to use too much because it will over power the brown and copper and look too harsh. Tip: Remember less is more and it's harder to go back and remove a lot of shadow so apply your shadow little by little :)
Step Four:
After all of that blending you may find the No17 goldish colour has been overrun by the brown and copper shadows so feel free to 'top up' that area if the colour has faded.
Line the lower lash line using the copper shadow on a slanted eyeliner brush. Starting from the inner corner, blend the shadow out using the tip of your slanted brush. Stop about one third of the way out.
*Tip: Dab along the lower lash line first before blending as this will insure the colour shows up. Go in between the lashes to blend the shadow to insure a well defined line with no gaps.* Clean up the edge of your line using a damp cotton bud. (I dampen mine with water)
If you do not have a slanted liner brush:
You can use a cotton bud to blend out the shadow after applying it with a normal eye shadow brush if you don't have a slanted liner brush. A liner brush is more ideal because it is smaller and creates a thinner, more even line but if you don't have one then use your regular eye shadow brush to line the lash line and blend with a cotton bud. The regular sponge tip applicators that come with eye shadows are ideal for this purpose too. If you use this method you can tidy up the line using a clean damp cotton bud.
Then line the rest of your lower lash line (starting from where you ended with the copper shadow) and in between your lower lashes with the brown shadow using the same slanted liner brush or using the alternative method mentioned in the previous step.
Step Five:
Line your upper and lower waterlines with the brown eyeliner pencil.
If you find black liner too harsh for your eyes or you do not like to use black as an eyeliner then skip to the next step now.
Otherwise go over the brown with a black eyeliner pencil on both waterlines. I like this because it gives a nice brown/black colour. You could use a black/brown pencil to save using two pencils but I had the both colours so I didn't mind using two.
Step Six:
Apply two coats of mascara. Allow the first coat to dry before applying the second. First I used Rimmel LashXXX to separate my lashes and then I used Rimmel Extra Super Lash to add volume and thickness.
This is the complete eye in natural light:
Step Seven:
Apply foundation and then buff (circular motions with a powder brush) some translucent powder over the top all over the face. Add blusher to the apples of your cheeks and blend (again, with circular motions with your blusher brush.)
Apply lipgloss to finish. I used Barry M #5 Eye/Lip pencil over the top of the No7 lipgloss listed in the product list to make the gloss 'frostier' and more pink in appearance.
This is the finished look :) (Yes, I am in my bathroom because the lighting rules in there :D)


