French Tip Tutorial

Tuesday, August 26, 2008
In this entry I am going to cover how to do a french tip nail using only nail polish. No tape or any kind of extra fussy tools needed!

I realise I do not have 'perfect' nails. I don't have the money to get them done at the salon all the time. I did my best with this tutorial all the same and I think I got the overall idea portrayed. I've never been able to grow my nails really long because they tend to break with my lifestyle. I'm just not much of a manicure girl anyway, I file them and polish them and that's it. Like I said, I did my best for you anyway.

What is a 'French Tip'?

The traditional french tip is a base coat, baby pink nail with a white tip and a clear coat to finish. Generally this is the most natural type if you don't want to look like you are wearing highly pigmented nail polish. Particularly useful for making your nails look pretty in a professional setting like school or work. The idea of the natural french tip is to create a pretty looking NATURAL nail. The white is used to fake a longer, whiter nail and the pink and clear coat makes the whole nail appear healthier.

It is best to do tips on nails that have been allowed to grow a little and that have been shaped. Falsies are also an option but it is entirely up to you.

Now that there are so many colours available you can do ANY colour tip you want. It's all about PERSONAL PREFERENCE. Most importantly, have fun with it!

I am going to cover both a traditional french tip in this tutorial and a few more brightly coloured ones for fun :)

You can buy the polishes required separately or you can buy them in sets. French tip manicure sets are available everywhere and some include both a base coat and a top coat like mine here:


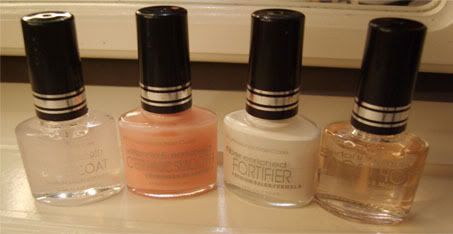
I got this set as part of a nail set and it was given to me as a gift a long time ago. I could not tell you where I got it from sorry! But places like Debenhams or any good department store will sell them. Make up counters may even stock them.

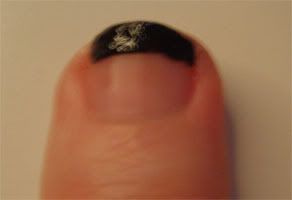
I also apologise in advance for the appearance of the white nail polish in the end photo. My nail white nail polish sucks and I didn't have any other to use.


Quick Tips

* NEVER pick your nail polish off. This will damage the surface of your nails and leave them dull looking and brittle. Always use a good nail polish remover.

* Use a moisturiser on your hands daily. Give them a break. The skin on your hands goes through a ton of crap day after day. If you have any kind of skin condition on your hands then see your doctor.

* Shaping your nails regularly helps to keep them strong and prevents splitting.


How To Do A Traditional Natural French Tip


What You Will Need:


Clear nail polish (To use as both a base and top coat but if you have top coat nail polish then use that instead)

Baby pink nail polish

White nail polish


Step One: Prepare!

* Work on a flat, hard surface like a desk or dressing table for stability purposes. Tidy up your area so you have a clear surface to work on. You don't want to be trying to grab your bottle of polish through the mounds of junk that have piled up on your table.

* Place some kind of protection down for the area you're working on. I personally just rest my hand on the back of an old A4 writing pad/notebook because the rough cardboard prevents my hands from slipping and sliding. I wouldn't recommend newspaper because if you spill anything it will go straight thorough and might leave black smudges on your table. Old gift paper or an old magazine opened up (flatten it out to stop any pages flying about) does the job. Or you can be like me and use the back of an old writing pad.

* Make sure you have good lighting. Whether it's natural or artificial doesn't matter much but it's necessary to be able to see what you're doing.


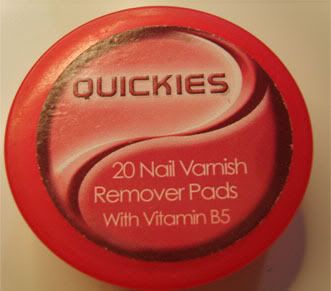
Quickies Nail Polish Remover Pads With Vitamin B5 - Available in most good supermarkets and drugstores:


Tesco Cotton Buds - 29p :D :D :D


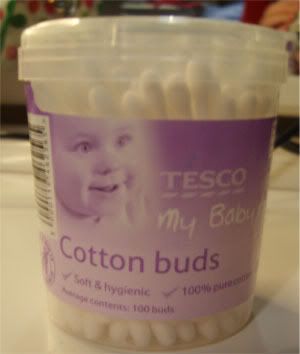
* Keep some nail polish remover and cotton buds handy in case you make a mistake. Fill a small plastic cap (you can use the cap of your nail polish remover bottle or any spare small cap/container you have) with nail some nail polish remover and keep it handy so you can just dip your cotton buds in there when you need to. Using dipped cotton buds is a much more precise method for correcting mistakes than using cotton balls as these tend to leave 'bits' behind and they're too big to offer precision. Nail polish remover pads are okay to use also. When I have been out of nail polish remover or when I am feeling lazy I just dab my cotton buds on one of these pads and it dampens them just fine.

* Shape and prepare your nails. Filing your nails stops them from weakening (very long nails tend to break more easily) and keeps them looking great. It's no use creating a beautiful tip only to find your nail is jagged needs to be filed. You'll have to start all over again and that's a pain! Get a good nail filer and sweep in ONE direction to shape your nails. I start one one side and file in ONE direction toward the other side until I am happy with the shape. Whatever shape you want is up to you. Rounded nails make fingers look longer and square nails make fingers look shorter. DON'T go back and forth with your nail filer when filing because you'll end up either breaking your nails or making them brittle.


Step Two: Base


Using a clear base coat will insure your polish lasts longer so apply one coat of clear polish to the entire nail and allow to dry.


Step Three: Pink Is My Favourite Colour


Once your clear coat is dry, add a coat of baby pink nail polish to the entire nail and leave to dry. Then add another over the top and leave to dry.

Start at the sides of the nails and work toward the centre. So swipe once on one side then once on the other side and then swipe the centre. Some people start in the centre but I personally find my finish is more even when I start at the sides and work inwards. I also feel I have more control using this method.


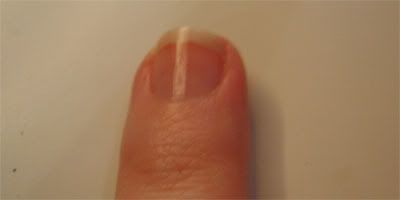
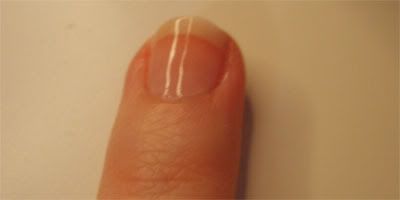
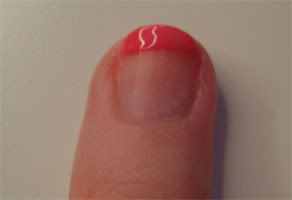
Step Four: White Tip


Now for the tip part of your french tip. This involves applying the white polish to the nail tip only to create a whiter looking nail tip. Always make sure you start with very little polish on your brush with whatever method you use because otherwise the polish will gloop everywhere and look messy and uneven. It is better to build the colour by using small amounts at a time for a smoother finish and to make correcting mistakes easier along the way. If you try to use too much at once it can cause the polish to gloop everywhere and then you'll have the tough/messy job of removing it all. You won't have much control with tons of polish on your brush either.

I tend to start on one side with a very small amount of polish on my brush and do small sweeps all the way over to the other side and then I go over that line to strengthen the colour and smooth the line. Sometimes I also sweep from one side to the other in one clean sweep but this takes practice and a steady hand to get right.

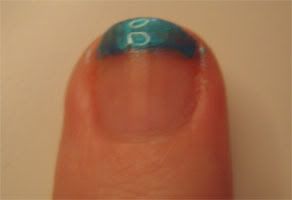
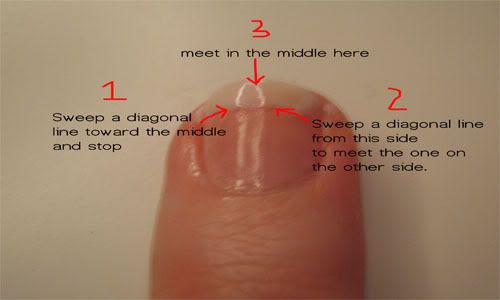
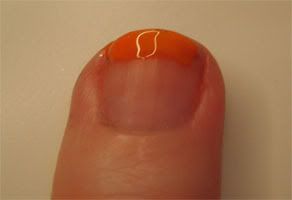
If you don't have a steady hand try resting your entire lower arm and wrist on a hard surface and then using your hand to apply the polish. By laying your arm flat it will have some support and you won't get so much 'shakey hand' syndrome. Then line the tip with polish by starting from one side and sweeping to the centre and then sweep up from the other side to meet the centre. I have tried to demonstrate this in the photo below. After you have done this you can go over the line to smooth it out until the colour is to your satisfaction.


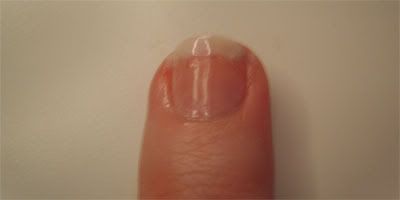
Step Five: Finishing Touch


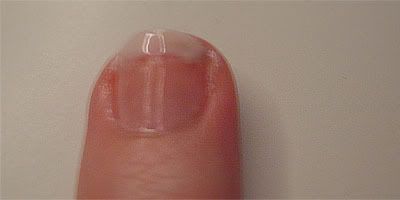
Once the tip has dried apply another coat of clear nail polish over the top and allow to dry. This will give a nice shiny finish and offers a stronger staying power for your nail polish.
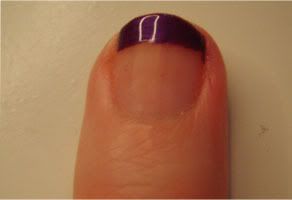

Coloured Tips:


What You Will Need:


Clear nail polish (It's optional if you want to apply a base coat first but this will help to prevent staining when using highly pigmented nail polishes. It will also help the staying power of your coloured polish)

Any coloured nail polish


Step One: Base

Apply the clear nail polish to the entire nail and allow to dry


Step Two: Colour Me Beautiful


Apply the coloured nail polish to the tip of your nail using the same method as explained above. Follow the same instructions for using only a small amount of colour at a time so that your polish doesn't go everywhere and end up looking messy.

Step Three: Clear Finish


Once your coloured polish has dried, apply clear nail polish over the top for a shiny, longer lasting finish.


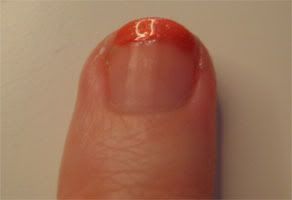
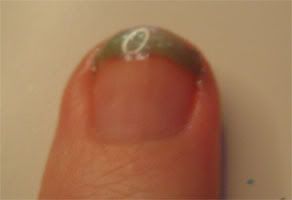
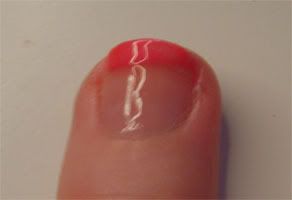
Here's a couple of coloured tips I did :) I apologise for the blur in some of them but that was my camera and couldn't be fixed.


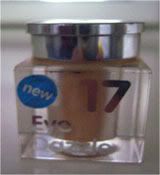
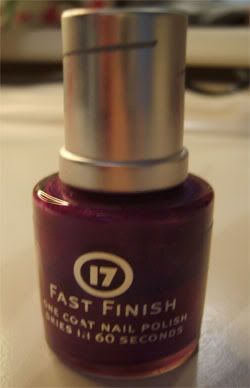
No 17 Fast Finish in 'Purple Wonder'


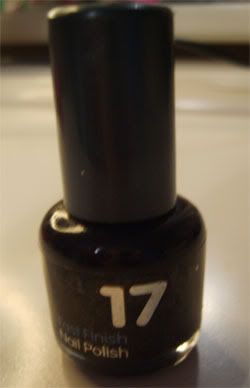
No17 Fast Finish in 'Night Shade'


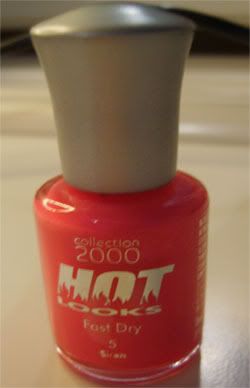
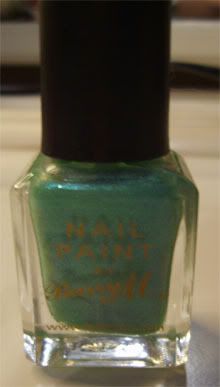
Collection 2000 Hot Looks in 'Siren'


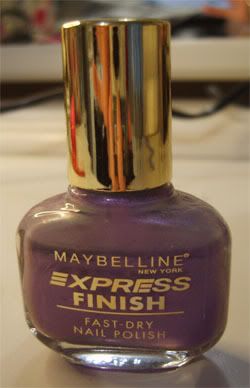
Maybelline Express Finish in 'Plum Prune'


Maybelline Watershine Diamonds in 'Sparkling Strawberry'


Barry M #285


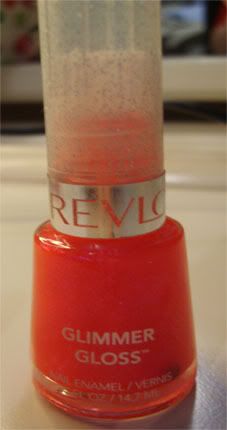
Revlon Glimmer Gloss in 'Strawberry Sizzle'


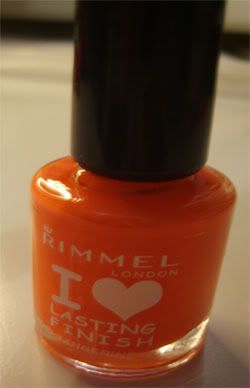
Rimmel I Love Lasting Finish in 'Tangerine Queen'


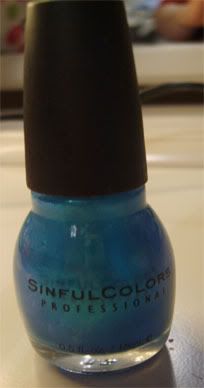
Sinful Colors in '282 Love Nails'


Massive Haul With Reviews

Saturday, August 23, 2008
These are some products I have had from a few weeks (the shadows/liner) to a few months (blush/hairspray and powder). I've tried and tested them all and now I'm going to review them :)

Tresemme Heat Defence Hair Spray - Smooth (Purple strip) - From any good supermarket or drugstore. Approximately £3 to £4.


You spray this over damp hair before drying/styling with hot tools like straighteners or curlers and it is supposed to protect your hair from heat damage, reduce frizz and promote shine in your hair. My hair tends to go very greasy if I use a lot of product on it and I found if I used too much of this it did make my hair a little bit greasy. All you need is a couple of spritzes over your hair. The spray itself is very light and smells very pleasant. My advice is to spray the dryer parts of your hair and avoid any areas that get greasy quickly. The spray pump occasionally needs a few squeezes to get a finer spray of the actual product as it has a tendency to jam and 'spit' rather than spray. It is difficult to tell if it actually protects my hair from anything and how well it does so because you'd need a microscope and lab coat for that but all in all my hair comes out smoother and shinier after using this. I personally can't do without it, I love the smell and the way it leaves my hair. Plus it's super cheap. I got a buy one get one free offer on mine from Tesco. You can buy Tresemme products at any good supermarket or drug store.


No17 Eye Dazzle Shadow in 'Good As Gold' - Approximately £3


I am going to be perfectly honest about my feelings toward this dust. The pigmentation was disappointing for No17 as I am used to their well pigmented mono shadows but if you pack this on a damp brush and use a cream base it will show up eventually. However it's hard to blend (the colour just fades away if you so much as move the shadow with your brush) and it fades quickly. I paid about £3 something for this and it wasn't worth the money. The good points are it has a very natural shimmery appearance to it so it would be ideal for a beginner who could apply it for day wear into night wear. It would be very nice over a more pigmented shadow to add a really nice shimmer. The colour is also very pretty once it shows up. Not bad but not great.


Maybelline Liquid Stay Shadow in 'Persistent Peach'. Not available in stores anymore but you can still buy it from Ebay. I paid about £1.70 but the prices vary from seller to seller.


This comes in a 6ml tube and has a sponge applicator. The applicator sucks up the product like no tomorrow and it is advisable have a good base on the lid beforehand. Also keep your cotton buds handy because this goes absolutely everywhere as a result of the applicator and you will find you'll need to clean up a lot. Don't try and sweep it on either because the colour disappears completely. In order to get it to show up you have to dab it on. But even then I found it creased. I even tried applying some to my MAC brush and dabbing it on but that just made it crease and smear all over the place even more. It's a liquid shadow but it feels like you're applying water to your lid as opposed to a shadow with the texture of a mixing medium for example which is kind of what I expected from a liquid eye shadow. It says it is crease resistant on the tube but that wasn't what I found. I hated the mess it made and the colour was more white peach thanks to the runny texture than the light orangey peach I was expecting from looking at the tube even after building it. Thumbs down :(


No7 Liquid Eyeliner - £8.50 from Boots


Very thin application brush which means if you want precision you've got it. Fair play to this it does go on very neatly. However the applicator is so thin that if you wanted to do a 'wing' effect you'd be there forever 'colouring in' the line to make it visible because the brush is so thin. If you like thin lines with your liner you will love this. Good for beginners as it doesn't all splodge on at once due to the application brush being so tiny but a little too pricey for an eyeliner. I got a £5 off voucher for mine from Boots but I wouldn't have spend £8.50 on it otherwise. It's 6ml in size and doesn't even have enough product for the money for my liking. However I do like it all the same. The pigmentation is high and the consistency of the liner itself isn't too shabby. Not too thin or thick and so far it has not flaked. I wore it on a night out dancing and it was going strong when I came home.


Rimmel Extra Super Lash Mascara in Black (Non Water-proof). Approximately £3 from any good drugstore or Ebay.


Everyone knows how much of a fan I am of Rimmel mascaras and I figured this one might be a let down since it wasn't as expensive as Lash XXX but I was very wrong. It's actually on the same level, if not slightly higher up than Lash XXX. The only thing this does not have is the benefit of the de-clumper fine comb that Lash XXX has. It's buildable and has a lovely texture (not overly thick or thin) and very little smell. What you can smell is pleasant. It gives me enormous sky high lashes and I love it. Also gives you fairly thick lashes. You can even curl with it and I did not use eyelash curlers at all but I got a huge curl out of this simply by rotating the wand against my lashes. I do not usually get a big curl unless I use curlers with my mascara but this saved me the fuss of using my curlers at all. Major thumbs up :)

Bourjois Shimmer Shadow in Beige Metallique. £4 from any drugstore.


Omg lovelovelove this shadow. I was a bit apprehensive about trying another liquid shadow after the disaster with Maybelline's but this beats Maybelline liquid shadow into the ground and thensome. The colour is more light peach than beige but I loved it all the same. The applicator is a sponge tip once again and that was the only downfall of this product. I find the sponges make the shadow crease a lot because they soak up so much product and make the shadow splodge all over my lid. I would highly recommend sweeping some of the product from the sponge onto one side of a compact (not a fluffy shadow brush) eye shadow brush and then dabbing it over the lid. It can get messy since it is a liquid shadow but I had nowhere near the amount of mess with this shadow that I got with Maybelline's. It only takes 2-3 applications for the colour to show up and trust me, it's a gorgeous peachy shimmery colour. Perfect for a natural day look or to blend with a darker shadow for the night. It blends really well too :) I swatched some on my hand at the store and expected the high shimmer to be duller once I got to daylight but it wasn't. It's such a gorgeous shadow and I like it so much I will be using it in my next tutorial so you can see the colour. Plus it lasts a really long time provided you use a good base but that applies to any shadow. I love this so much I am going to buy the other colours when I can :D


Collection 2000 Translucent Pressed Powder approximately £2.99


Translucent powder is used to help your foundation last longer. Some powders help control shine and have an SPF depending on which brand you buy. I think this one has an SPF but do not quote me on that!

Fairly fine powder it does a fairly good job of concealing mild shine attacks. I don't have oily skin but if I did I don't think this would do it any good or conceal any shine but then again, it does not say that it is a shine controlling powder so you can't expect it! It has a nice texture and since it's translucent you can hardly see it once it is applied. Very good for beginners who just want to practice using powder. You apply this to a fluffy brush, tap off the excess and buff it over your foundation or over any area of your face you need it. It conceals redness okay but not greatly. Some people buff it over their blusher too. I tend to only do this if I am using cream blusher because if I am using a powder blush it will just pick up the powdered blush and send it all over my face with the translucent powder. Does a good job of keeping my blusher lasting though. I like it.


Maybelline Dream Mousse Blusher in '01 Dolly Pink'. Approximately £3-4 from any good drugstore or Ebay.


This is a mousse blusher which means you can not apply it using a brush and if you did, good luck to you because you'll probably either not see any colour at all or see too much depending on what brush you're trying to apply it with. Oh, and you'll most likely get clumps of product stuck in your brush. (Awesome.) Best applied with a sponge or fingers. I apply mine with clean fingers.

Lots of people complain that these blushes don't show up but maybe it's down to my fair skin that I can see it clearly on mine. I LOVE the colour of this in particular because it gives that fresh pinky flush colour to my cheeks which is perfect for the daytime. I wouldn't use this for the night because it's too light. It also has a shimmer running through it so if you don't like shimmery blushes or have oily skin then you may not like this.

The texture is very very soft and there's no smell. I like creamy blushers because they blend much better into the skin than mineral blushers but it is all a matter of personal preference at the end of the day. Some people like mineral blushers because they're supposedly better for the skin but each to their own on that one. I still like cream blushers. This one is buildable too but I only have to put a little on in dabbing motions with my fingers and it shows up fine. I then blend it into my foundation and it still shows up fine. You could use this to add a touch of shimmer to your blush if you find it doesn't show up well on you. Either way I love it and it has been known to last all day one my face once I set it with my translucent powder.

Navigation Changes!

Tuesday, August 19, 2008

Hey everyone!

I finally figured out how to use some of the gadgets on Blogger.

You can now find everything in my makeup blog neatly organised in the side bar. I have categorised my entries to make looking for specific entries MUCH easier!

As it stands some of the reviews for different products are on the same page. This is because when I do a 'haul' I often don't just buy one kind of product. I buy a couple and then when it comes to reviewing them I have a mix of products to review from the haul as a result.

I will try and keep to the same products in my reviews/haul entries in future to make it much easier for you all to find the exact product review you are looking for but this may not happen all the time if I get excited about more than one kind of product in my hauls but I will try :P

Anyway, happy (and much easier!) navigating :)


Green Smokey Eye With Black

First let me start by saying I LOVE MeMeMe eye shadows. They last SO long. Seriously. I have worn them out on a night out and they stay really vibrant! (Providing you use a good base of course ;) ) You can buy them at Superdrug or on Ebay. Superdrug always have sales and currently they have a few MeMeMe products at half price so check that out :) Tip: They are especially vibrant when using a foundation or creme shadow base.

Natural Collection are getting harder and harder to find so just use any pink lipstick with a frosty/pearl finish. Revlon's 'Silver City Pink' has a pearl finish and slight peach undertone and would go really well with a clear gloss over the top. I don't have it yet so I can't show you it or comment on the quality but I have seen the colour of it and I am planning on buying it in future.

Anyway, this is a smokey green eye with a hint of black. For all those who find brown/black smokey eyes too dark/overbearing. If you don't like or suit greens, don't worry, I'll have a smokey eye for most colours coming up :) I am very reluctant to say any look I do is for a particular eye colour because I don't believe all that crap about only ever matching shadows to specific eye colours. I think matching a shadow to your skin tone as well as your eye colour is more important than matching it to your eye colour alone.


Alright, onward with the tutorial!

NOTE: I used No7 'Pink Shimmer' Blusher on my cheeks. I was a noob and forgot to include it in my 'Face' photo. D'oh :( Also I labelled the MAC shadow as 'Velvet' and I should have labelled it as 'Beauty Marked'. My bad, the writing has faded a little on the back so I didn't notice it until later.


Products On...


Face:


Eyes:


Lips:


Tools used for...


Eyes:


Face:


Tutorial


Apply a base to the lids first of all. I used Barry M #5 Eye/Lip pencil. This will insure your shadow stays on longer and that the colour stays vibrant. Then apply the lighter green in the MeMeMe Green Goddess duo to the entire lid using a patting motion with your brush. I used the MAC 239 to apply mine.


Take some of the darker green in the duo on a fluffy eye shadow brush and blend into the crease line and outer one third of the lid. Feel free to 'top up' the lighter green on the inner portion of your lid if it has faded with all the blending.


To smoke out the green, I added MAC 'Beauty Marked/Velvet' to my crease and blended it well with the green. (Any black eye shadow will do though.) I applied more of the darker green from the Goddess duo on top of the Velvet shadow to soften it out and lighten it a little. Remember, as always, less is more so don't put too much on all at once. Add your black shadow bit by bit to avoid having to take all your shadow off and start again.


Complete the look by applying No17 'Oynx' to both waterlines. (I realise my eyeliner in this photo looks a teensy bit dodgy but that is because I removed my previous makeup to do this tutorial and my waterline still had some baby oil around it which made my liner smudge a little) To find your waterlines, gently pull your upper/lower lash line up/down and you will see a line of fleshy pink skin. Those are your waterlines and that is where you apply your pencil eyeliner. (DON'T apply liquid liner to the waterline because they're too wet for liquid liner and it definitely won't stick!) Add two coats Rimmel Extra Super Lash mascara or any voluminous mascara you have. (Allow the first coat to dry before applying second and wiggle your brush to prevent clumps) You can stop here or go to the next step to add an extra 'kick' to the look.


To add an extra 'kick' to this look line the inner portion of your lower lash line (about one third of the way in)with the lighter green shadow from the Goddess duo and then apply the darker green from the middle part of your lower lash line all the way to the outer corner. I used a slanted Ruby and Millie liner brush to do this and I patted the shadow on with my brush before blending it out.


Full Look:

I finished the look off by sweeping No7 Pink Shimmer blusher over the apples of my cheeks. Then I applied my #5 Barry M Eye/Lip pencil to my lips and blended it out. This creates a base for my lipstick to stick to. Then I added a coat of Natural Collection 'Candy Mist' lipstick for a cute pink tone and a coat of No7 'Angel Cake' lip gloss over the top to add a shiny finish.


Brown and Copper Smokey Eyes Tutorial

Monday, August 18, 2008
This has become my ultimate favourite smokey eye type lately! I love it :) My brows are messy - deal with it.

Brushes Used In This Tutorial: (I left one out, I'm sorry but I only have time to post this entry now and it's very late at night and I have been working on this tutorial for hours. The one I left out can be found in my Beauty Tools For Beginners and it's the MAC 213)


1: MAC 239 Eye shadow brush (Used to apply gold and copper shadow)

2: Ruby and Millie Slanted Eye Liner Brush (Used to line the copper and brown shadow on lower lashes)

3: Barry M Blusher/Bronzer/Powder 3 in 1 Brush (Used to apply both my translucent powder and blusher. I don't have any problems with my blusher or translucent powder 'mixing' when I use it for both by the way)


Products Used In This Tutorial: (I know, the light hit the blusher, I'm sorry, again for the same reason above I didn't have time to retake the photo. The blusher is a shimmery deepish pink colour)


1: Bourjois Shimmering Shine Liquid Eye Shadow number 33 in 'Beige Metallique'

2: No17 Eye Shadow Trio in 'Metallic Toffee'

3: MAC NW15 liquid foundation

4: Collection 2000 Translucent Powder

5: Rimmel Lash XXX Mascara in 'black/non-waterproof'

6: Rimmel Extra Super Lash Mascara in 'black/non-waterproof'

7: MAC Eye Shadow in 'Velvet'

8: No17 Glitter Eye Shadow in 'Chalice'

9: Natural Collection Eye Liner pencil in 'Brown'

10: No17 Eye Liner Pencil in 'Onyx'

11: No7 Blusher #35 in 'Pink Shimmer'

12: Barry M Shimmer Eye/Lip Pencil #5

13: No7 Liplicious Lip Gloss in 'Angel Cake'


Step One:

First apply the Barry M #1 Eye/Lip pencil as a base (or any base you are comfortable using): Then take Bourjois Shimmering Shine Liquid Eye Shadow in 33 Beige Metallique and apply one coat to the entire lid. The applicator allows you to both dab and sweep the shadow on but because it is liquid shadow it might stick better to your skin (depending on your skin type) if you dab it. Personally I swept mine on and it worked perfectly for me. Try whatever works for you. Let it dry and then apply another coat over the top to strengthen the colour.

Then I dabbed some of the lightish gold colour from the No17 trio into the corner of my eye, stopping one third of the way over the lid. What you can see in the photo is not a 'gap' but where I applied the colour and my camera picked it up a bit oddly!


Step Two:

Take a little of the darker brown colour from the No17 trio and dab some over the outer corner of your lid. Stop about one third of the way in. Then blend the same colour into your crease, taking the shadow all the way in to the corner of your eye and slightly higher on your brow bone but don't go further than the brow bone. If you feel the area around your lid/eye socket you'll feel a hard area that is your brow bone. Going further up than that with any shadow will make you look overdone and decrease the size of your eyes so be careful about that. This will give you that 'smokey' effect. If you find you have a sharp line where your darker shadow meets your lighter shadow just diffuse the line with your brush using circular or back and forth motions. I personally do not like using circular motions to blend this part because it sends the shadow here there and everywhere on my lids (I have larger lids so it makes too much of a mess for my taste!) but you should do what you're comfortable with.


Step Three:

Take the copper shadow and dab it over the middle and outer corner of the lid over the brown and then blend into the brown using circular motions or whatever motion you are happy with. You can use the coppery colour from the trio but I prefer to use my separate copper shadow. This will give the darker brown from the trio a nice coppery/shimmery effect. Add a little of the brown (from the same trio) over the top of the copper again to darken it slightly so that it remains quite 'smokey' looking. (The copper may lighten the brown) I also added a very small amount of MAC 'Velvet' and blended it (with my MAC fluff brush. See: 'Beauty Tools For Beginners' entry for the exact number of the brush) into the brown to offer a really nice smokey appearance to the shadow. Any black shadow will do the job in the same way. Just be sure not to use too much because it will over power the brown and copper and look too harsh. Tip: Remember less is more and it's harder to go back and remove a lot of shadow so apply your shadow little by little :)


Step Four:

After all of that blending you may find the No17 goldish colour has been overrun by the brown and copper shadows so feel free to 'top up' that area if the colour has faded.

Line the lower lash line using the copper shadow on a slanted eyeliner brush. Starting from the inner corner, blend the shadow out using the tip of your slanted brush. Stop about one third of the way out.

*Tip: Dab along the lower lash line first before blending as this will insure the colour shows up. Go in between the lashes to blend the shadow to insure a well defined line with no gaps.* Clean up the edge of your line using a damp cotton bud. (I dampen mine with water)


If you do not have a slanted liner brush:
You can use a cotton bud to blend out the shadow after applying it with a normal eye shadow brush if you don't have a slanted liner brush. A liner brush is more ideal because it is smaller and creates a thinner, more even line but if you don't have one then use your regular eye shadow brush to line the lash line and blend with a cotton bud. The regular sponge tip applicators that come with eye shadows are ideal for this purpose too. If you use this method you can tidy up the line using a clean damp cotton bud.

Then line the rest of your lower lash line (starting from where you ended with the copper shadow) and in between your lower lashes with the brown shadow using the same slanted liner brush or using the alternative method mentioned in the previous step.


Step Five:

Line your upper and lower waterlines with the brown eyeliner pencil.

If you find black liner too harsh for your eyes or you do not like to use black as an eyeliner then skip to the next step now.

Otherwise go over the brown with a black eyeliner pencil on both waterlines. I like this because it gives a nice brown/black colour. You could use a black/brown pencil to save using two pencils but I had the both colours so I didn't mind using two.


Step Six:


Apply two coats of mascara. Allow the first coat to dry before applying the second. First I used Rimmel LashXXX to separate my lashes and then I used Rimmel Extra Super Lash to add volume and thickness.

This is the complete eye in natural light:


Step Seven:

Apply foundation and then buff (circular motions with a powder brush) some translucent powder over the top all over the face. Add blusher to the apples of your cheeks and blend (again, with circular motions with your blusher brush.)

Apply lipgloss to finish. I used Barry M #5 Eye/Lip pencil over the top of the No7 lipgloss listed in the product list to make the gloss 'frostier' and more pink in appearance.

This is the finished look :) (Yes, I am in my bathroom because the lighting rules in there :D)