Thursday, December 31, 2009
Hi all!
I'm sorry there were no more Holiday looks. I got a new camera literally yesterday and so I felt it was worth waiting until I got it before I did any more. The new camera I got is a DSLR camera and it's going to be SO much easier for me and way better for you to see the make up looks I do now. Working with my digital camera was a nightmare. I used to have to sit and take the same photo over and over just trying to get it to show clearly. It was kind of off-putting if I am honest. I am only a newbie to SLR'S so I sometimes find myself doing stupid stuff like not taking the lense cap off and wondering why everything is 'dark' - Lol! I'm such a noob.
Anyway, I am not even going to sit here and promise looks 'soon'. Things in my life seem to be persistent in getting in the way >.< Instead I'll say I'll do them when I can. I'm currently not feeling too great but I really want to at least do a vlog on my makeup channel today so look out for that. You can find my makeup channel on Youtube here: http://www.youtube.com/bluesparks24
I also would like to do a haul on here (just to test drive my camera too :D) so look out for that.
I haven't been well for about a week now, I have had some personal problems, health problems and life generally hasn't been too great. But even so I'm hoping things will get better.
Hope you all had a great Christmas and have fun whatever you do for NYE and NYD
Michelle <3
MERRY CHRISTMAS TIME!
Thursday, December 24, 2009
My Christmas Tree!

Merry Christmas everybody! Hope you all get everything you wish for :) And have a fab new year whatever you get up to.
New Years makeup looks have started on my blog so keep checking them out because I'll be updating again on Boxing Day and a do few others for New Years :)
Loads of love and lipstick!
Michelle xxxxxxxxxxxx
Glitzy Glamorous Holiday Look
Wednesday, December 23, 2009This look is perfect for the holidays. It’s glittery, pretty and simple to create. Enjoy! (Sorry for the minor spelling mistake in the 'Urban Decay Glide On Pencil' photo!)
Products Used On:
Face
Maybelline Dream Satin Liquid Foundation in 'Light Porcelain'
MAC Blush in 'Dame'
Eyes
MAC Paint in 'Untitled'
MAC Mono Eye Shadow in 'Knight Divine'
Urban Decay 24/7 Glide On Pencil in 'Zero'
Bourjois Clubbing Mascara in 'Black'
Collection 2000 Glam Crystals Glitter Eye Liner In 'Glitz'
GOSH Eye Dust in 'Holographic Silver'
Lips
MAC Lipstick in 'Creme Cup'
E.L.F. Studio 'C' Brush
MAC 257 Brush (Travel Sized)
Ruby and Millie Liner Brush
Ms MakeUp Foundation/Concealer Brush
GOSH Blush Brush
Begin by applying some kind of eye primer to your eyes. This will ensure your eye shadow stays vibrant and crease-free for many hours. I am using MAC Paint in ‘Untitled’ as my base here. Blend over the lid using your finger.

Take ‘Knight Divine’ (or any dark silver. Good alternatives to MAC’s ‘Knight Divine’ can be found in my product list on this entry.) on an eye shadow brush and pat the shadow all over the lid until it is covered. Then softly blend the shadow over the lid. I am using E.L.F’s Studio 'C' brush.

Use a fluffy eye shadow brush to blend the shadow into the brow bone to create a ‘smokey’ appearance. I am using the MAC 275 (travel sized) brush.

Dab GOSH Holographic Silver over the top of the dark silver.
APPLICATION TIP: To reduce glitter fallout, dip your brush in the glitter eye dust and then spray it lightly with water. This will help to seal the glitter onto the brush. Take a little at a time. If you overload you can't go back but if you don't apply enough you can always add more.

Take Collection 2000 Glam Crystal Eye Liner in ‘Glitz’ (or any silver glittery eye liner) and line the upper lash line and inner third of the lower lash line. When lining the upper lash line you can either just have the line go across your lid or you can ‘wing’ it out by drawing the line just a little past the eye lid.

(Inner third lined)

Using a liner brush, line the rest of the lower lash line with the dark silver. I am using the Ruby and Millie liner brush.

Take a black eye shadow and begin by dabbing it over the dark silver on your lower lash line to place the colour. Then softly smudge it into the silver with a liner brush. I am once again using my Ruby and Millie liner brush.

Line your waterlines with a black eyeliner pencil. Lightly draw a little black eye liner on top of the black and silver on the lower lash line. Smudge in with a liner brush. By placing the liner on top of eye shadow you are creating a good base for the liner to stick to and deepening the colour.

Comb your lashes with an eyelash comb to separate them. Apply a mascara of your choice. I am using Bourjois ‘Clubbing’ Mascara on my top and bottom lashes. Combing the lashes before applying mascara will ensure your mascara goes on evenly and reaches every lash.
**MASCARA APPLICATION TIP*** To get the best of your mascara begin by combing the product through your entire lashes before ‘wiggling’ it through them to create volume and then combing them out once more. You can repeat these steps until you are happy with the result, depending on how dramatic you want your lashes to look. Comb any clumps out when your mascara is still wet, do not try and comb them out when it is dry because this will tug at your lashes. This technique should lengthen and thicken your lashes nicely.

Wipe away any fallout on your face and then apply foundation. I am applying liquid foundation with a foundation brush.

Apply blush. I am using a light pink one.

Apply a light pink lipstick of your choice.

EXTRA: You can apply false lashes if you’d like. They go well with this look. I am using ‘Girls With Attitude’ lashes.
Here is the whole look without false eye lashes:


And here it is with false lashes:


Hi
Monday, December 14, 2009
Hi all.
I know I haven't updated since October. I am really sorry. I actually had something really crappy happen to me and I have been a bit of a hermit for a while.
I'm gonna be back soon. I've got a lot going on still and it's hard to fit in makeup blogs in between everything but I am planning on coming back.
Take care!
Halloween Looks
Tuesday, October 13, 2009
Hey all,
I just wanted to write an entry to (yet again) apologise for the lack of content. It's now Halloween and I've only managed to get one look up on my Youtube channel and zero looks up on here.
I am quite gutted in all honesty. I thought I would be able to keep up but I've started uni and things are crazy. I'm not just making excuses, they really are. I leave the house between 8am and 9am and I am gone until late afternoon. By the time I get home, bathe, eat and talk to my boyfriend it's time for bed.
I am so sorry. I feel like I spend most of my time on here apologising for having little content and I feel really bad about it.
I really want to make this up.
SO! I WILL without a single doubt be doing many November and Christmas looks instead and I will be starting them early. For those of you who requested Halloween looks for both this blog and my youtube which I did not post I will still do them but I will do them as fancy dress/occassion looks instead since Halloween is now here.
I hope this will make it up to you. I know all I do is say sorry but I mean it.
Love you all <3
September Mini Clothing And Make Up Haul
Thursday, September 10, 2009
Hey all! This is just a quick clothing/makeup haul of stuff I bought today. Enjoy!
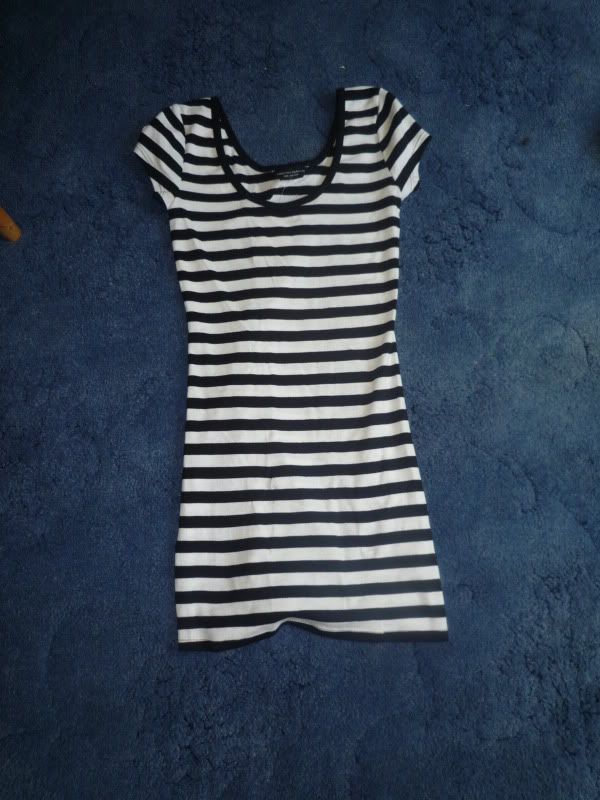
These are the clothes I bought. Jeggings and stripey top both from Dorothy Perkins.
Jeggings: £22
Top: £10

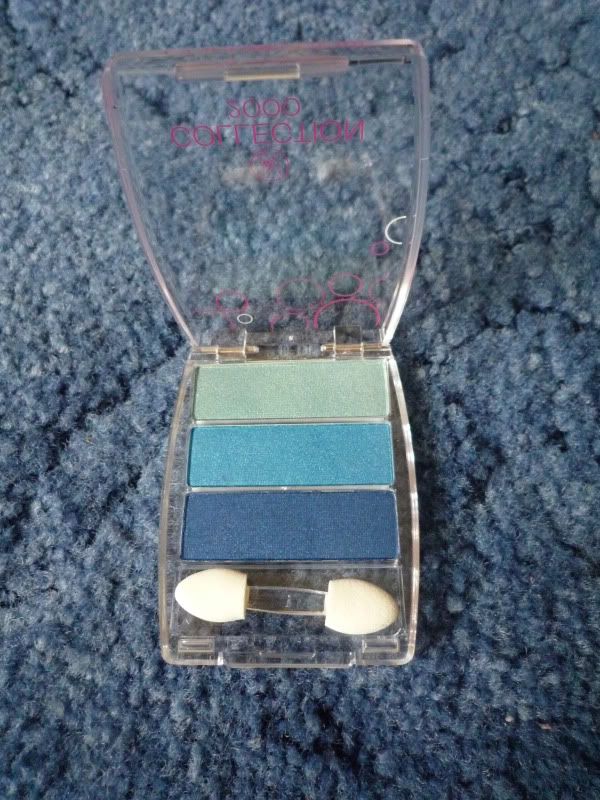
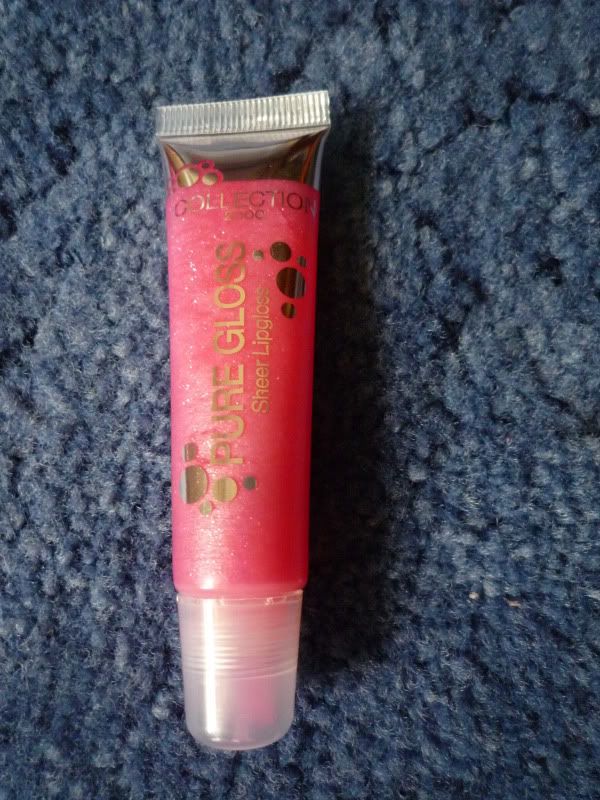
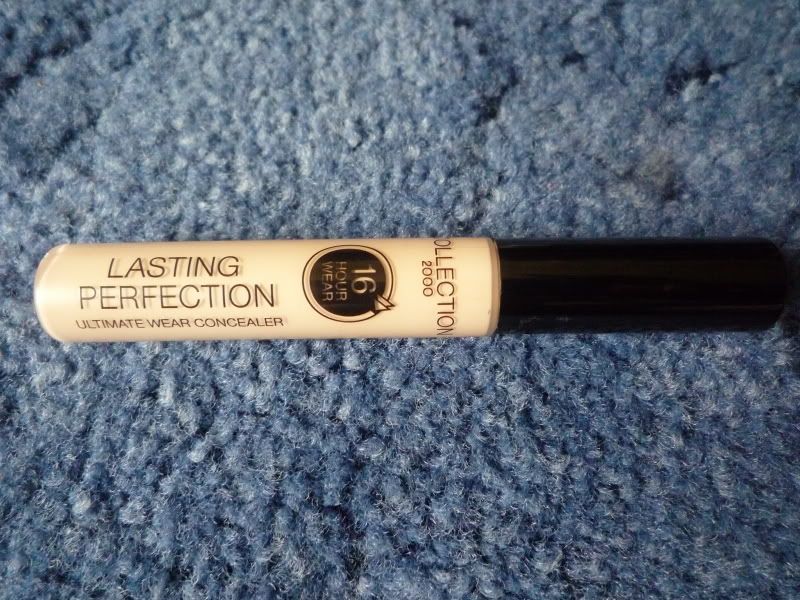
I also bought some Collection 2000 makeup. Eye shadow trio, gloss and concealer. Also a hair grip. They have new sheer lip glosses and 16hr wear foundation/concealer out at the moment. They were on offer and I got them even cheaper with my student card :D Yay!
Eye shadow Trio: 06 'Lush' - Approx £3
16 Hour Concealer in 'Fair'- £2.91. Going up to £3 something after a while.
Pure Lip Gloss: 'Candyfloss' - £1.95
Hair Grip: £1.95 from Superdrug (All hair items currently buy one get one half price)
These are the clothes I bought. Jeggings and stripey top both from Dorothy Perkins.
Jeggings: £22
Top: £10
I also bought some Collection 2000 makeup. Eye shadow trio, gloss and concealer. Also a hair grip. They have new sheer lip glosses and 16hr wear foundation/concealer out at the moment. They were on offer and I got them even cheaper with my student card :D Yay!
Eye shadow Trio: 06 'Lush' - Approx £3
16 Hour Concealer in 'Fair'- £2.91. Going up to £3 something after a while.
Pure Lip Gloss: 'Candyfloss' - £1.95
Hair Grip: £1.95 from Superdrug (All hair items currently buy one get one half price)
Review: MAC Studio Fix Powder
Sunday, September 6, 2009
Product:
MAC Studio Fix Powder
My Shade: NW20


How much does it cost?
£19
How much product for that?
15g
Is it scented?
No
How long does it last?
All day. Great lasting power!
What's the packaging like?
Comes in a compact with a mirror and sponge. The compact opens and closes very easily. Mirror and sponge are very handy for application on the go. A travel flat top kabuki is useful for applying this on the go if you don't want to use the sponge it comes with.
How do I apply it?
Apply with a powder/stippling brush, sponge, or a powder puff. For best results use a stippling brush as this will give you an airbrushed effect. Sponges tend to waste product too so a brush is a better alternative. The MAC 187 is an example of what a Stippling brush looks like. GOSH have a much cheaper alternative. Just visit any GOSH counter and it is under 'Face' brushes. It looks almost exactly the same as the MAC 187 too.
What is the formula like?
Soft and non-chalky. (read here for more information on what is in the formula) non reflective. You get a very matte finish.
What is the coverage like?
Very good coverage. Covered the reddish patches on my face nicely. Non reflective so no shine whatsoever. Also helped to control the oilier parts of my face nicely. However the coverage won't be as good as a liquid foundation because it is a powder. Nice matte finish that lasted all day though.
Down points?
Pricey but you do get quite a bit of product for your money.
Review: Sleek Ink Pot Gel Eye Liner
Sleek (Waterproof) 'Ink Pot' Gel Eye Liner
Shade: Dominatrix (Black)


How much does it cost?
£3.91 from Superdrug. Awesome :D You get 10% off again if you show your student card so even cheaper. Yipee!
Is it scented?
No.
How much product do I get?
4g
How do I apply it?
For best results use with an eye liner brush. Slanted, straight and very thin liner brushes all work but very thin ones work best with this kind of liner in my personal opinion. I use the MAC 209 to apply it. Dip your brush into the product and remove excess on the back of your hand. Then line your eyes. Start from the middle and work outwards then work inwards from the middle point of the eye once you have minimum product on your brush. Having minimum product on the brush when lining the inner part of the eye stops the line from being overly thick and sloppy in this difficult to reach area. Set with a black powdered shadow for long lasting results.
How long does it last?
I have worn this 8+ hours and it has lasted nicely. I set mine with a powdered black shadow to ensure it lasted that bit extra. Otherwise it would probably last about around 8 hours. It goes on but it starts to weaken in colour after this time.
What's the formula like?
Very smooth and very comfortable to wear. Glides on!
Does it come in any other colours?
Yes. Several. Yellow, deep purple, bright orange, green and white.
Down points?
Doesn't come in a non waterproof formula so you have no choice but to use waterproof if you wish to try these.
Hard to remove and to correct since it is waterproof. I highly recommend using something like baby oil (one that is SAFE to use as an eye makeup remover. CHECK THE LABEL!) or any oil based makeup remover. Creme based ones won't touch this. Use a cotton bud dipped in baby oil or oil based makeup remover to correct mistakes.
It is buildable so you have to work slightly to get intense colour. To me this is not a down point as I like my products to be buildable but if you're fussy you might not like this factor.
Review: MAC Face And Body Foundation
Product: MAC Face And Body Foundation
My Shade: C1

Swatch

How much does it cost?
£23 from any MAC store or online at MAC's website. Please be aware that the price varies with delivery charges if you order online.
Does it have a scent?
No, it's completely unscented.
How does it work? How much coverage do I get?
MAC Face and Body Foundation is a liquid foundation but unlike Studio Fix Liquid Foundation, (and the majority of liquid foundations out there) this is much thinner. It goes on like water and then dries fairly quickly enabling you to spread the foundation and blend it into the skin effectively. The coverage is sheer so you will see a much more natural coverage than any other thicker foundation.
Unlike Studio Fix this does not have SPF. Foundations with SPF reflect light in flash photography and this can make you look ghastly white so if you want picture perfect appearance whilst clubbing for example then this is very ideal. Go one shade darker than normal if you want extra coverage as this is very sheer. SPF is essential and I still stress the importance of using it but if you want to go clubbing for example you aren't going to need SPF so this factor will not matter.
Read here for more information on the formula of this product.
How do I apply it?
Use a foundation brush or your fingers for best results. A sponge won't be as effective due to the formula being thinner which will cause your sponge to absorb most of the product. In all honesty I apply this with clean hands as I have found this to be the best method.
What's the perfomance like?
Like all MAC Foundations this has exceptional lasting power. I have worn it for 8+ hours and it has lasted nicely. It would certainly stand up to heavy clubbing!
What about removing it?
This comes off easily. I personally use a facial cleansing wash to take it off but use whatever method you're happy with.
How about the packaging?
This comes in a 120ML plastic bottle. It has a screw cap lid and a small nozzle to enable more control on how much product you want to extract so less waste!
Any down points?
Only in that the useability may be difficult for some people who are used to thick liquid foundations. You will find this much thinner and blends much differently to your usual liquid foundation but once you get past this, it's excellent to use.
This is also pricey but it lasts a very long time so you do get your money's worth.
Some people have also complained that this makes their shiny complexion shinier. I don't have an oily complexion but I did notice after 8 hours wear that certain areas of my face had a little shine. This was easily resolved with some blotting powder but I imagine for anyone who suffers with an oily complexion that this may be hit or miss for you.
August/September 2009 Haul
Hi all. This is just a haul of stuff I bought over the past two months. I will be reviewing some items in different entries to let you know my thoughts. Enjoy!
Sleek Ink Pot Eye Liner Gel In 'Dominatrix'
Price: £3.91 from Superdrug


No7 Extravagent Lashes Mascara
Price: £11 from Boots


MAC Studio Fix Powder In NW20
Price: £19 from MAC Department in Debenhams

MAC Studio Fix NW20 And GOSH Stippling Brush
GOSH Brush can be bought from GOSH stands in Superdrug or online.

MAC Face And Body Foundation in C1
Price: £23 from MAC Store


Barry M Lip Paint in '147'
Price: £4.25


Shimmery Smokey Coppery Chocolate Eyes
Wednesday, June 24, 2009Brushes Used
MAC 239 (To apply/blend shadows 1 and 2)
MAC 217 (To diffuse shadows)
Ruby and Millie liner brush (To line with Chocolate shadow on lower lash line)
Ms Make Up small compact shadow brush (To apply 'Chocolate' shadow to crease line)
Ms Make Up blending brush (To highlight brow bone)
Products Used

1. L'Oreal Trio in '317/Honey Brown'
2. Wet N Wild Duo in 'Chocolate/Vanilla'
3. MAC Paint in 'Untitled' (used as a primer/base)
4. Collection 2000 VolumeSensation Mascara in 'Black'
5. Rimmel Exaggerate Waterproof Liner in 'Black'
6. No 7 Blusher in 'Petal'
Products Used On:
Face:
Maybelline Dream Satin Liquid Foundation in 'Light Porcelain'
No7 Blusher in 'Petal'
Eyes:
1. L'Oreal Color Appeal Trio in '317/Honey Brown' (The one for Hazel eyes)

Wet N Wild Duo in 'Chocolate and Vanilla' (Vanilla on right, Chocolate on left)

Collection 2000 VolumeSensation Mascara in Black
Rimmel Exaggerate Waterproof Retractable Eyeliner in Black
Lips:
NYX Lipstick in 'Strawberry Milk'
Maybelline Watershine Lipgloss in 'Cutie Pie'
Tutorial
Apply an eye primer of your choice. I am applying my MAC Paint. Blend over the lid with a clean finger. Eye primers ensure your eye shadow stay on longer and don't crease/fade throughout the day.

Using a normal shadow brush, shade the entire lid with the number ‘2’ shadow from the L’Oreal trio.

Pick up the number ‘1’ shadow from the L’Oreal trio and apply to the outer third of the lid. Use sweeping motions to blend with the number ‘2’ shadow.

Using a small compact shadow brush, blend the ‘Chocolate’ shadow from the Wet N Wild duo one third of the way along the crease line.

Then take it about half way across the upper lash line. Go in between your lashes as best as you can with this colour.

Touch up the number ‘1’ and ‘2’ shadows if you need to at this point as sometimes blending over them can take away the colours.
Diffuse the shadows with a fluffy eye shadow brush. Smoke out into the brow bone.

Highlight your brow bone with the number '3' shadow from the L'Oreal trio. Use a larger blending brush to do this.

Line the outer half of the lower lash line with the ‘Chocolate’ shadow from the Wet N Wild duo using a liner brush. Position your liner brush underneath your lower lashes and touch the brush as close as possible to your lash line. Dab the shadow to place it and sweep to soften it.

Line the upper and lower waterlines with Rimmel Exaggerate Waterproof Eyeliner in Black. Comb the lashes to separate them. This will ensure you get maximum coverage with your mascara and reduces the risk of clumps. Next apply Collection 2000 Volumesensation mascara to the lashes. Tab the lashes (touch the wand to your lashes and let go quickly) and then comb them through for maximum volume.

Apply your usual foundation and No7 Blusher in ‘Petal’ to the apples of the cheeks.

Soften the lips with a lip balm

Apply NYX lipstick in ‘Strawberry Milk’. Blend in with your finger or a lip brush.

Finally apply Maybelline Watershine lipgloss in ‘Cutie Pie’ over the top to finish.

Voila!


Please excuse my cleavage...

Subscribe to:
Comments (Atom)
|
|
|
|
|
|
|
|
|
|
|
|
|
|
|
|
|
|


